Every game of Fiasco comes with a good tilt or two. Halfway through the game, after everyone got to play out two scenes, the first act ends. But before the next act starts, the players roll on the Tilt Table, using the dice that remain after players earned (and gave away) during act 1.
In my case, that’s six dice, since every player/character adds four dice to the start of the game (12) and half of them are gone now.
There are some other small rules for who gets to decide what to do with the dice after they have been rolled, but since it’s just me here, I get to ignore that.
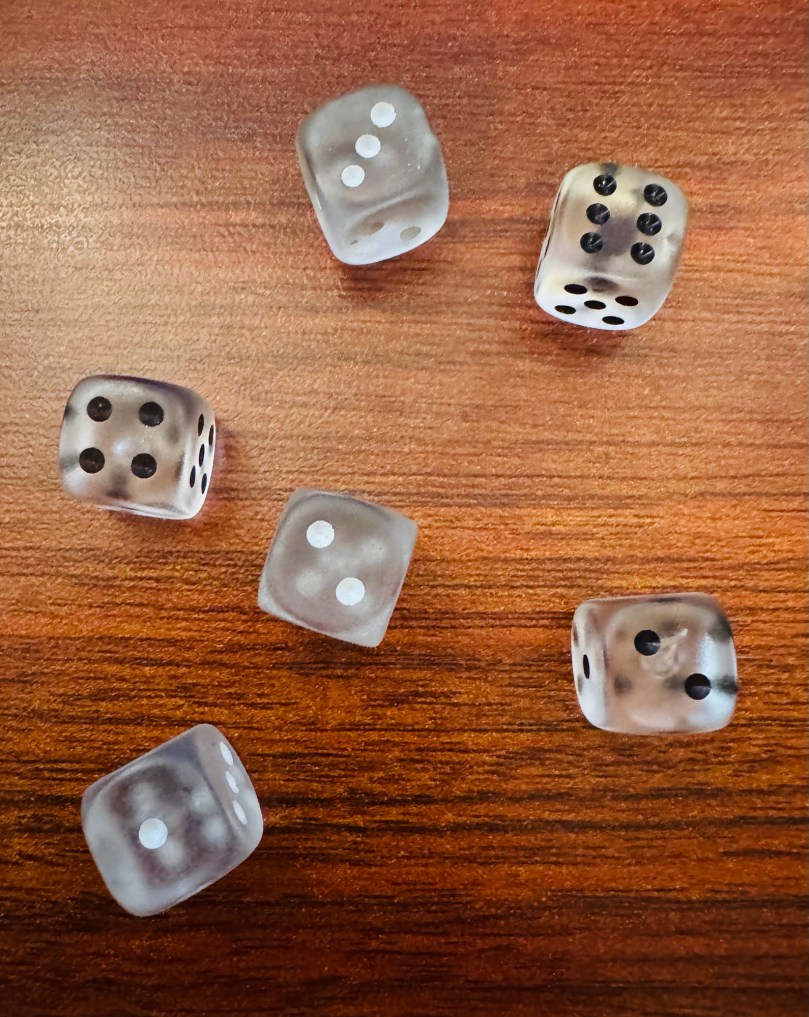
So, let me show you the result of my dice (I used real dice, even; these bad boys have been around since the early 00s when I first started playing Shadowrun 3rd edition):

One (1), Two (2), Two (2), Three (3), Four (4), Six (6)
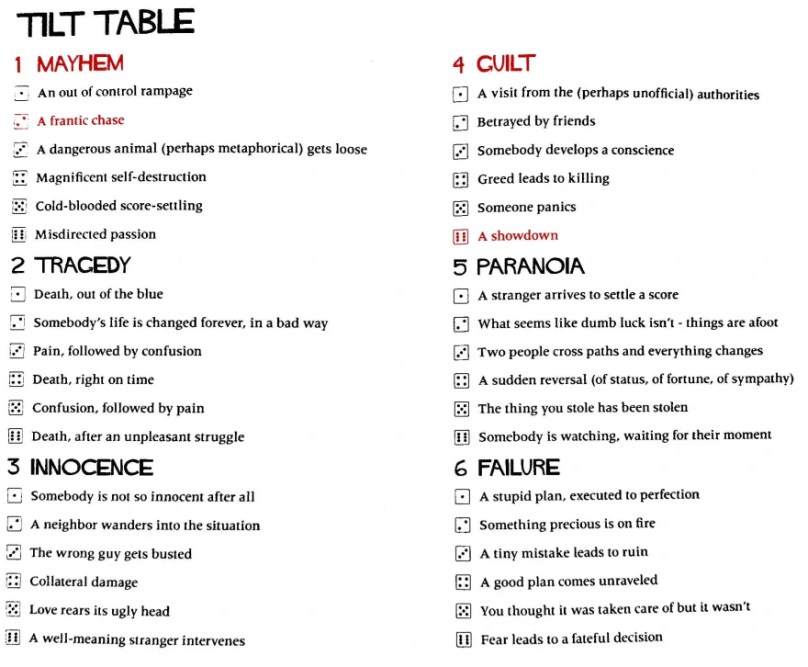
So, let’s look at the Tilt table and see what we can do with this. Much like setting up relationships and details, I get to use a rolled die to pick a category, and then another one to select the specific detail. For the tilt, I get to do this twice, generating to two different tilt elements.
I already highlighted my choices in red.

As you can see, I used a 1 and a 4 to select the categories of “Mayhem” and “Guilt” and then a 2 and a 6 to pick “A frantic chase” and “A showdown” respectively. There are many more variations possible with what I had rolled, and the choice is never easy. I could have added a Tragedy: Pain, followed by confusion, or Failure: Something precious is on fire. So many good options.
Let me talk about why I chose what I chose.
Mayhem: A frantic chase
There is non-zero chance that the cops will get involved at some point. Maybe Bill did end up calling this in, or someone else tips them off. Or, maybe, someone else comes after the crew. One way or another, a frantic chase scene sounds like fun, considering that the story started with Jay and Bill fighting over control over their vehicle.
Guilt: A showdown
The bomb and detonator are important to Bill and Jay’s relationship, even though Ash currently has possession of it. Bill is also a rat, and Jay means business. I think it’s quite likely that all of this will result in a 3-way showdown between the crew. Loyalties tested, friendships broken, old feelings burning bridges that are being crossed. Their past lives and present situations are on a collision course, and only one of them will walk away. Probably.
Tilt The Hell Out Of It
From this point on, every scene will be affected by the tilts in some way. There are no hard or fast rules as to when and how a tilt element should come in—could be right away, could be at the last second—but I should keep them in mind when framing every single scene. The crew is already in a messed up situation, and the tilt elements I chose all but guarantee that things will get hectic, fast, and personal. Like rats on a sinking ship, even the way out is dangerous and deadly.
Act 2 Setup
I won’t need to set up any new elements beyond the tilt for act 2. The character rotation stays the same, and the only difference is that everyone now gets to keep the dice they earn. So Bill will end this story with only two dice—let’s hope they are at least of the same color. The higher you roll on either color, the better your outcome, even if they’re all black.
Unlike Act 1, I won’t be deciding ahead of time which scene ends with what die color. Instead, I’ll feel it out between the card draw and writing the scene itself. I have three of each color left, so this could go either way for the crew. The only exception is the very last scene (Jay). While he’s stuck with the final die color for the purpose of determining his Aftermath, his scene resolution can be either good or bad, player’s choice. A little perk for being the very last player to have a scene.
I’m still creating a very basic outline, however, just to have a bit of an idea of what to expect when drawing cards.
Act 2 Outline
- Scene 7: Bill is forced to board the train when his two friends are nowhere to be found.
- Scene 8: Ash is cornered by Jay after hiding somewhere on the train.
- Scene 9: Jay is doing whatever it takes to regain control.
- Scene 10: Bill is coming clean to Ash about his job.
- Scene 11: Ash confronts her aunt.
- Scene 12: Jay detonates the bomb.
And there you have it. Two tilt elements to ensure our “heroes” won’t get out of this clean, and a simple outline for might happen next. As always, the cards and actual pen-to-paper will decide if it things play out that way or not.
Either way, what follows is guaranteed to be one hell of a Fiasco.
Discover more from Behind The Wall
Subscribe to get the latest posts sent to your email.
